
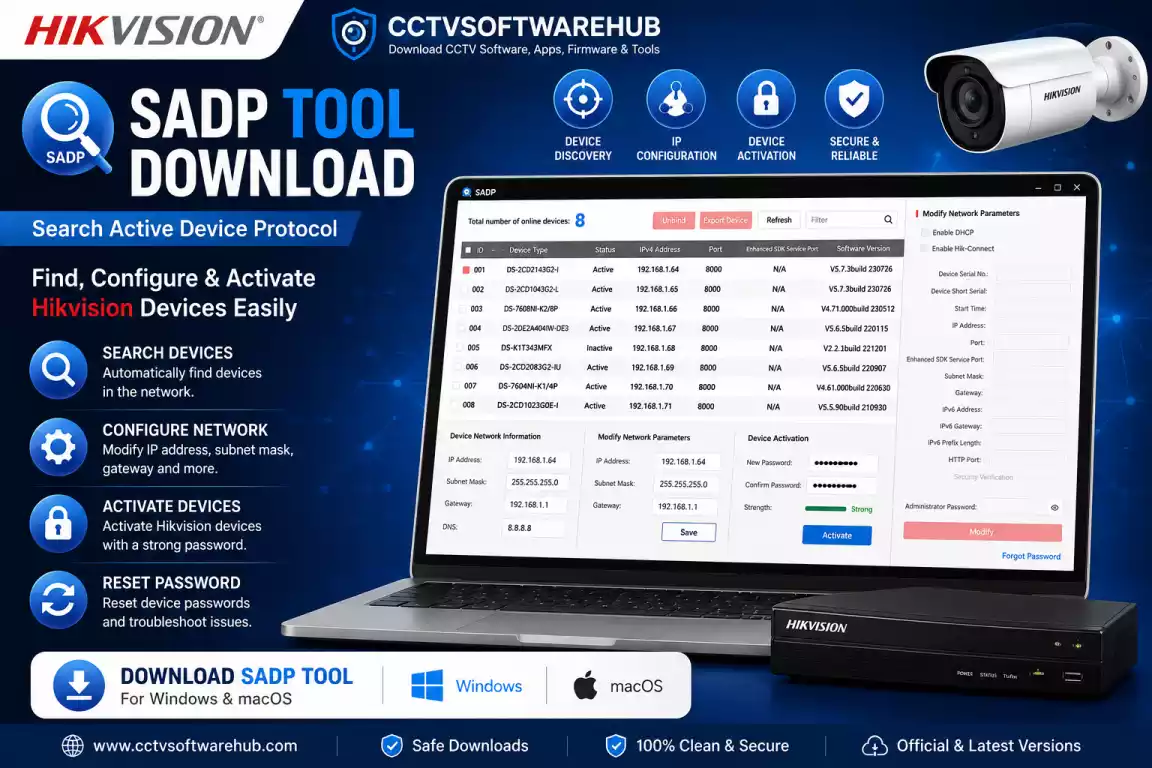
SADP Tool Download helps you quickly find Hikvision camera IP addresses, activate new devices, change network settings, and troubleshoot connection problems. After working with CCTV systems for more than 10 years, I still use this free Hikvision utility because it’s the fastest way to discover and configure Hikvision cameras. In this guide, I’ll show you how to download, install, and use the SADP Tool step by step.
Whether you’re installing a brand-new Hikvision camera, replacing a DVR, or troubleshooting a device that has disappeared from your network, the SADP Tool Download is one of the most important first steps. Unlike manually guessing IP addresses or scanning your network with third-party software, the SADP Tool automatically discovers compatible Hikvision devices within seconds and displays important information like IP address, firmware version, serial number, activation status, and subnet details.
In this guide, I’ll cover everything you need to know, including how to download the latest version, install it on Windows or Mac, activate a new camera, change IP addresses, reset passwords, and fix common issues if the software doesn’t detect your devices.
Where Can You Download the Latest SADP Tool?
I always recommend downloading the latest version because Hikvision regularly fixes bugs, improves compatibility with newer firmware, and enhances security. Older versions may not recognize recently released cameras or NVRs.
| Software | Operating System | Version | Download |
|---|---|---|---|
| Hikvision SADP Tool (Latest) | Windows 11 / 10 | V3.1.4.6 | ⬇ Download |
| SADP Tool Download | Windows 11 / 10 | V3.1.2.3 | ⬇ Download |
| SADP Tool | Windows | V3.0.4.3 | ⬇ Download |
| SADP Tool Old Version | Windows | V3.0.1.4 | ⬇ Download |
| Hikvision SADP Tool for Mac | macOS | V1.0.0.4 | ⬇ Download |
| SADP Tool for Mac | macOS | V1.0.0.3 | ⬇ Download |
Official Source: Hikvision also provides the latest version on its official support portal. I recommend verifying the version there if you’re unsure whether you’re using the newest release.
Important Notice
Important: Hikvision has announced that the SADP Tool will no longer receive feature updates and recommends users migrate to HiTools Delivery for future device management. HiTools Delivery includes device discovery, IP configuration, password reset, firmware upgrades, and additional deployment features for newer Hikvision devices.
If you’re setting up newer Hikvision cameras or want access to the latest features, I recommend downloading HiTools Delivery instead. You can read my complete installation guide here:
SADP Tool Software Information
| Feature | Details |
|---|---|
| Software Name | SADP Tool (Search Active Device Protocol) |
| Developer | Hikvision Digital Technology Co., Ltd |
| Category | CCTV Device Discovery & Configuration Tool |
| Compatible OS | Windows 7, 8, 10, 11, & macOS |
| Supported Devices | Hikvision IP Cameras, DVRs, NVRs, Video Intercom, Access Control Devices |
| License | Freeware |
| Language Support | Multi-language |
| Latest Version | Varies by release (See Download Table Below) |
| Last Updated | August 2026 |
| Key Features | Device Discovery, IP Address Configuration, Device Activation, Password Reset Assistance, Network Configuration |
What Is the SADP Tool?
The SADP Tool (Search Active Device Protocol) is a free network utility developed by Hikvision that automatically discovers Hikvision devices connected to your local network. It allows you to activate new devices, find their IP addresses, change network settings, and perform password recovery for supported products.
Instead of manually scanning your network or logging into your router, the software detects compatible devices within a few seconds and displays detailed information in one place.
When I install a new Hikvision camera, I don’t start by opening a browser or guessing the camera’s IP address. I simply launch the SADP Tool, wait a few seconds, and every compatible Hikvision device connected to the same network appears on the screen.
This saves a significant amount of time, especially when installing multiple cameras in offices, shops, schools, warehouses, or residential projects.
What Does SADP Stand For?
SADP stands for Search Active Device Protocol.
It is Hikvision’s proprietary device discovery protocol designed to locate Hikvision products connected to the same Local Area Network (LAN).
Unlike a traditional IP scanner, SADP communicates directly with Hikvision devices, allowing it to display information that standard network scanners often cannot access.
Which Devices Does the SADP Tool Support?
The software supports a wide range of Hikvision products, including:
- Hikvision IP Cameras
- Hikvision DVRs
- Hikvision NVRs
- PTZ Cameras
- Video Intercom Systems
- Access Control Devices
- Network Storage Devices
- Some OEM Hikvision Products
If your camera is manufactured by another brand, the SADP Tool may not detect it unless it is an OEM model based on Hikvision hardware.
What Information Does the SADP Tool Display?
Once your device appears in the software, you’ll see valuable information such as:
- Device Name
- IP Address
- Subnet Mask
- Gateway
- MAC Address
- Device Serial Number
- Firmware Version
- Device Model
- Activation Status
- HTTP Port
- Device Type
This information is especially useful when configuring a CCTV system for the first time or troubleshooting network connectivity issues.
Why Should You Download the SADP Tool?
If you own a Hikvision camera or recorder, downloading the SADP Tool can save you hours of troubleshooting. I personally consider it one of the most essential utilities for Hikvision installations because it simplifies several tasks that would otherwise require manual network configuration.
Whether you’re a homeowner installing a single IP camera or an installer setting up dozens of surveillance devices, the software helps you complete the job faster and with fewer errors.
Key Features of the SADP Tool
| Feature | Supported |
|---|---|
| Automatically Detect Hikvision Devices | ✔ |
| Find Camera IP Address | ✔ |
| Activate New Devices | ✔ |
| Change IP Address | ✔ |
| Modify Network Settings | ✔ |
| Reset Password (Supported Models) | ✔ |
| View Firmware Version | ✔ |
| Export Device Information | ✔ |
| Display Device Serial Number | ✔ |
| View Activation Status | ✔ |
1. Quickly Find Hikvision Camera IP Addresses
One of the most common questions I receive is:
“How do I find the IP address of my Hikvision camera?”
Instead of scanning the entire network, the SADP Tool instantly lists every supported Hikvision device connected to the same LAN.
This is much faster than using a generic IP scanner because the software also identifies inactive devices and displays additional information specific to Hikvision hardware.
2. Activate New Cameras in Minutes
Brand-new Hikvision cameras remain inactive until you create a secure administrator password.
The SADP Tool lets you activate one or multiple devices directly from your computer without opening a browser.
This is especially helpful when installing several cameras during a new CCTV setup.
3. Easily Change the IP Address
IP conflicts are one of the most common reasons cameras become inaccessible.
Using the SADP Tool, you can quickly modify:
- IP Address
- Gateway
- Subnet Mask
- DNS Settings
- HTTP Port
without needing to log into the camera’s web interface.
4. Recover Forgotten Passwords
For supported devices, the software provides password reset options using Hikvision’s verification process.
Although password recovery requires verification, the SADP Tool simplifies the process by generating the necessary export files and guiding you through the reset workflow.
5. Save Time During Large Installations
When installing multiple cameras, manually configuring each device can be time-consuming.
With the SADP Tool, I can detect every connected camera, activate them, assign unique IP addresses, and verify firmware versions from one interface.
This significantly speeds up large surveillance projects and reduces configuration errors.
Who Should Use the SADP Tool?
The software is useful for:
- Homeowners installing a new Hikvision camera
- Small business owners managing CCTV systems
- Security system installers
- IT administrators
- Network engineers
- CCTV maintenance professionals
- Anyone troubleshooting Hikvision IP cameras, DVRs, or NVRs
Whether you’re setting up your first camera or maintaining an enterprise surveillance system, the SADP Tool makes device discovery and configuration much easier.
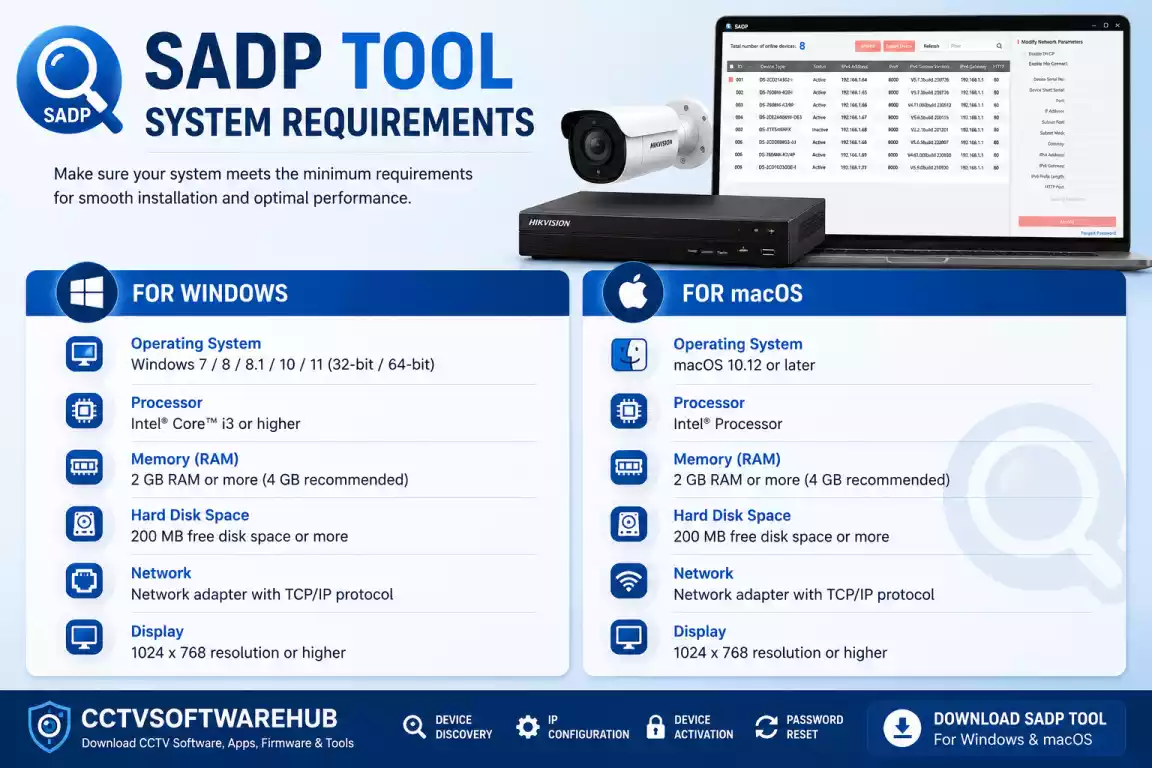
What Are the System Requirements for the SADP Tool?
Before downloading the software, I recommend checking whether your computer meets the basic system requirements. The SADP Tool isn’t resource-intensive, but running the latest version on a supported operating system ensures better compatibility with newer Hikvision devices.
Minimum System Requirements
| Component | Requirement |
|---|---|
| Operating System | Windows 7, Windows 8, Windows 10, Windows 11, macOS |
| Processor | Intel Core i3 or equivalent |
| RAM | 2 GB (4 GB Recommended) |
| Storage | At least 200 MB Free Space |
| Network | Ethernet or Wi-Fi connected to the same LAN |
| Internet | Required only for downloading the software or password recovery |
| Permissions | Administrator Rights Recommended |
My Tip: I always install the SADP Tool on Windows 10 or Windows 11 because Hikvision releases updates for Windows first. Although there is a SADP Tool for Mac, Windows generally offers better compatibility and receives new features earlier.
How Do You Download the SADP Tool on Windows?
Downloading the SADP Tool for Windows only takes a few minutes. However, I recommend downloading the latest version whenever possible because it supports newer Hikvision cameras and firmware.
Step 1: Download the Installer
Scroll to the Download section at the top of this page and click the latest SADP Tool Download for Windows button.
Alternatively, you can verify the latest version on Hikvision’s official download center before downloading.
Step 2: Save the Installer
Choose a location on your computer such as:
- Downloads
- Desktop
- Documents
Wait for the installer to finish downloading.
The download size is usually small, so it should complete within a few seconds on most internet connections.
Step 3: Extract the ZIP File (If Required)
Some versions of the software are distributed as ZIP archives.
If your download is a ZIP file:
- Right-click the downloaded file.
- Select Extract All.
- Choose a destination folder.
- Click Extract.
You should now see the installation files.
Step 4: Run the Installer
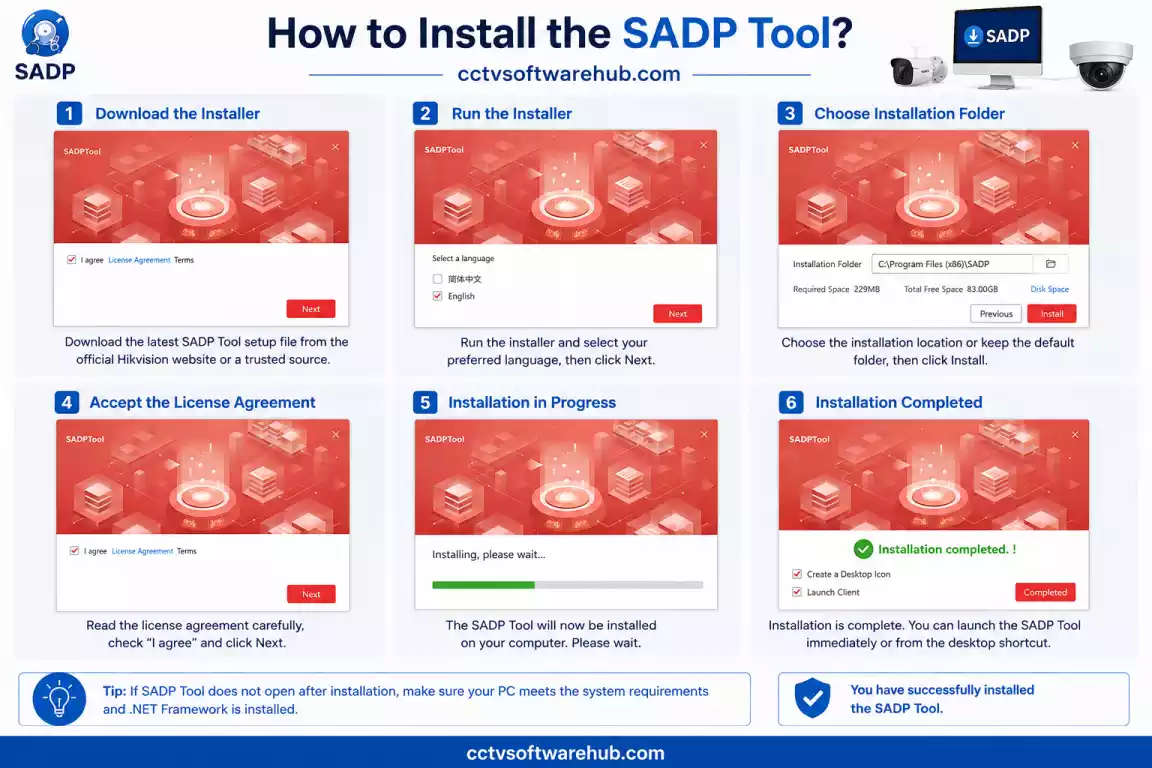
Locate the installation file.
Double-click:
SADPSetup.exe
If Windows displays a security warning, click:
Run Anyway
or
Yes
depending on your Windows version.
Step 5: Accept the License Agreement
Read the license agreement.
Click:
I Agree
Then continue.
Step 6: Choose Installation Folder
The default installation location works perfectly for most users.
Click:
Next
unless you want to install it somewhere else.
Step 7: Complete the Installation
Click:
Install
The installation usually takes less than one minute.
After installation finishes, click:
Finish.
You can now launch the software from your desktop shortcut or the Windows Start Menu.
How Do You Install the SADP Tool Correctly?
Although installing the software is straightforward, I’ve seen many users run into problems simply because Windows blocks network access or required drivers aren’t installed.
Here are the steps I personally follow every time.
Install as Administrator
Right-click the installer.
Select:
Run as Administrator
This prevents permission-related issues during installation.
Allow Windows Firewall Access
When you launch the software for the first time, Windows Firewall may ask for permission.
Always select:
✔ Private Networks
Click:
Allow Access
If you accidentally click Cancel, the software may fail to detect cameras on your network.
Install Npcap (If Prompted)
Some versions of the SADP Tool require Npcap, a packet capture driver that allows the software to discover Hikvision devices on the local network.
If prompted:
- Click Install Npcap.
- Follow the setup wizard.
- Restart your computer if required.
My Tip: If the SADP Tool opens but doesn’t detect any cameras, reinstalling or updating Npcap often resolves the issue.
Restart the Computer
Although not always necessary, I usually restart my computer after installing networking software.
This ensures all drivers load correctly before scanning for devices.
Does the SADP Tool Work on Windows 11?
Yes. The latest version works perfectly on Windows 11.
I currently use it on Windows 11 without any issues for:
- Detecting cameras
- Activating devices
- Changing IP addresses
- Password recovery
- Firmware identification
If you’re using Windows 11 and the software doesn’t detect your camera, the problem is usually related to your network or firewall—not Windows itself.
Can You Install the SADP Tool on a Mac?
Yes. Hikvision also provides a SADP Tool for Mac, allowing macOS users to discover and configure compatible Hikvision devices.
The installation process is similar to Windows, although there are a few differences.
How to Install SADP Tool on macOS
- Download the macOS installer.
- Open the downloaded DMG file.
- Drag the application into the Applications folder.
- Launch the software.
- Allow network permissions if macOS requests them.
The software will then begin scanning your local network for Hikvision devices.
macOS Permissions You Should Allow
Because the application scans your network, macOS may request permissions such as:
- Local Network Access
- Firewall Permission
- Application Verification
I recommend allowing these permissions; otherwise, the software may not detect your devices.
Why Is My Mac Not Detecting Hikvision Cameras?
If you’re using SADP for Mac and your camera doesn’t appear, check the following:
- Both devices are connected to the same network.
- macOS Firewall isn’t blocking the application.
- You’re using the latest version.
- The camera is powered on.
- The Ethernet cable is working correctly.
- Your switch or router isn’t isolating clients.
In my experience, most detection issues on macOS are caused by firewall settings or network isolation.
Common Installation Problems and Their Solutions of SADP Tool
Even though the installation is simple, these are the issues I encounter most often.
| Problem | Possible Cause | Solution |
|---|---|---|
| Installation won’t start | Missing Administrator permission | Run as Administrator |
| Software won’t open | Corrupted installer | Download the installer again |
| Camera not detected | Windows Firewall | Allow SADP through Firewall |
| Empty device list | Different subnet | Connect both devices to the same LAN |
| Scan never completes | VPN enabled | Disconnect VPN |
| No devices found | Npcap missing | Install or reinstall Npcap |
| Camera appears Offline | Network cable issue | Check Ethernet cable and switch |
| Installation freezes | Antivirus interference | Temporarily disable antivirus during installation |
My Installation Tips After Years of Using the SADP Tool
After installing Hikvision devices for many years, I’ve developed a simple checklist that prevents almost every installation issue.
Before launching the SADP Tool, I always make sure that:
- The camera has power.
- The Ethernet cable is securely connected.
- The PC and camera are connected to the same router or switch.
- No VPN is running on my computer.
- Windows Firewall allows the SADP Tool.
- Npcap is installed correctly.
- The device has finished booting (this can take 30–60 seconds after powering on).
Following this checklist has saved me countless hours of troubleshooting, especially on larger installations with multiple cameras.
Pro Tip: Verify Device Discovery Before Opening a Browser
One mistake I often see beginners make is trying to access the camera through a web browser before confirming its IP address.
Instead, I always open the SADP Tool first. Once the camera appears in the device list, I note its IP address, activation status, and firmware version. Only then do I access the camera through a browser or add it to software like iVMS-4200.
This simple workflow reduces setup errors and makes the entire installation process much smoother.
How Do You Use the SADP Tool After Installation?
Once you’ve installed the SADP Tool, you’re ready to start discovering and configuring your Hikvision devices. This is where the software becomes incredibly useful. Whether you’re installing a single IP camera at home or configuring multiple cameras for a business, the workflow remains almost the same.
Personally, this is the first application I open whenever I work with a Hikvision camera or NVR. Before logging into a web browser or adding devices to iVMS-4200, I always verify that the device is visible in the SADP Tool.
If the device appears here, there’s a good chance the rest of the setup will go smoothly.
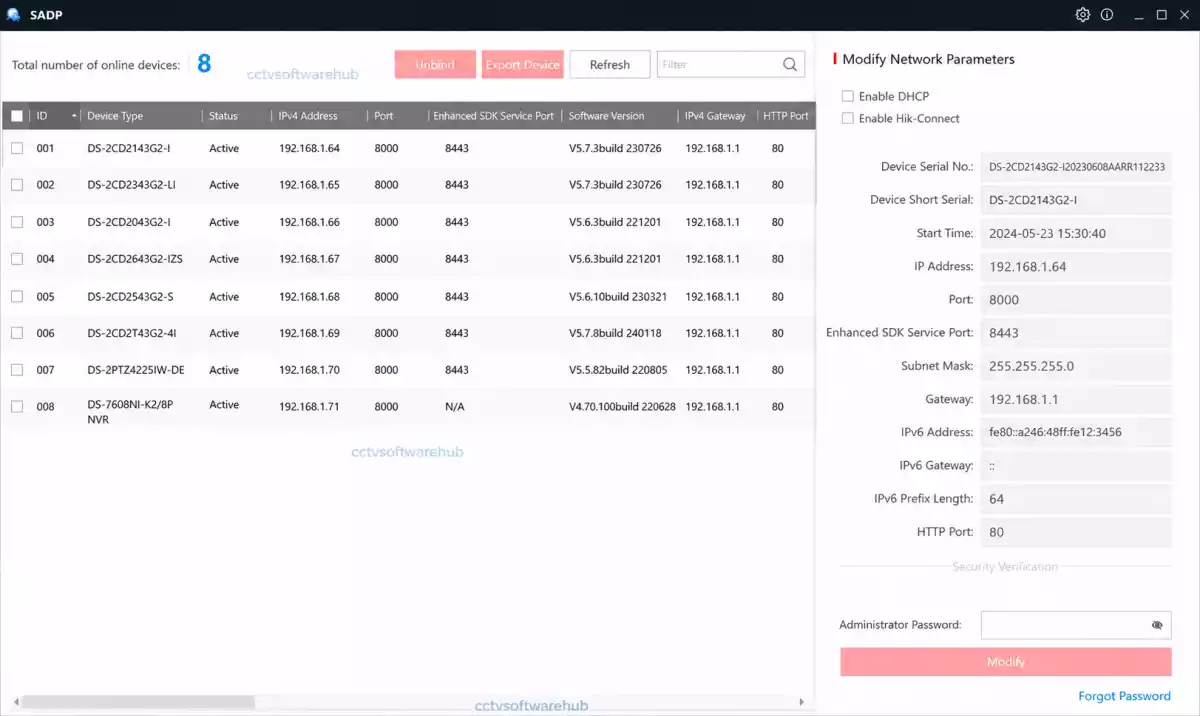
What Happens When You Open the SADP Tool?
When the application starts, it automatically scans your local network.
Within a few seconds, every supported Hikvision device connected to the same LAN should appear in the device list.
Depending on your network, the scan may take anywhere from 5 to 20 seconds.
You’ll see information such as:
- Device Model
- Device Type
- IP Address
- MAC Address
- Serial Number
- Firmware Version
- Activation Status
- HTTP Port
- Gateway
- Subnet Mask
Understanding the SADP Tool Interface
Before changing any settings, it’s worth understanding the layout.
Device List (Left Panel)
This section displays all detected Hikvision devices.
Each row represents one device.
Typical information includes:
- IP Address
- Device Name
- Device Model
- Serial Number
- Firmware Version
- Status
- Security Level
Device Information (Right Panel)
When you select a device, the right panel displays editable settings.
Depending on the device state, you can:
- Activate Device
- Change IP Address
- Change Gateway
- Change Subnet Mask
- Modify HTTP Port
- Enable DHCP
- Export Device Information
Refresh Button
Clicking Refresh performs another network scan.
I often use this after connecting a new camera because it may take a few seconds for the device to boot.
How Do You Find the IP Address of a Hikvision Camera?
Finding the IP address is one of the main reasons people download the SADP Tool.
Instead of checking your router or using a generic IP scanner, the software shows the camera’s IP address immediately after discovery.
Step 1: Connect the Camera
Connect your Hikvision camera to:
- The same router
- The same network switch
- A PoE switch
Ensure your computer is connected to the same local network.
Step 2: Open the SADP Tool
Launch the application.
Wait for the scan to complete.
Step 3: Locate Your Camera
Once detected, you’ll see a row similar to this:
| Device | IP Address | Status |
|---|---|---|
| DS-2CD2143G2-I | 192.168.1.64 | Active |
The IP Address column shows exactly where your camera is located on the network.
You can now:
- Open it in a browser
- Add it to iVMS-4200
- Configure it in an NVR
My Tip
If multiple cameras appear, I usually identify the correct one by checking the Serial Number printed on the camera label.
This avoids configuring the wrong device, especially during larger installations.
How Do You Activate a New Hikvision Camera?
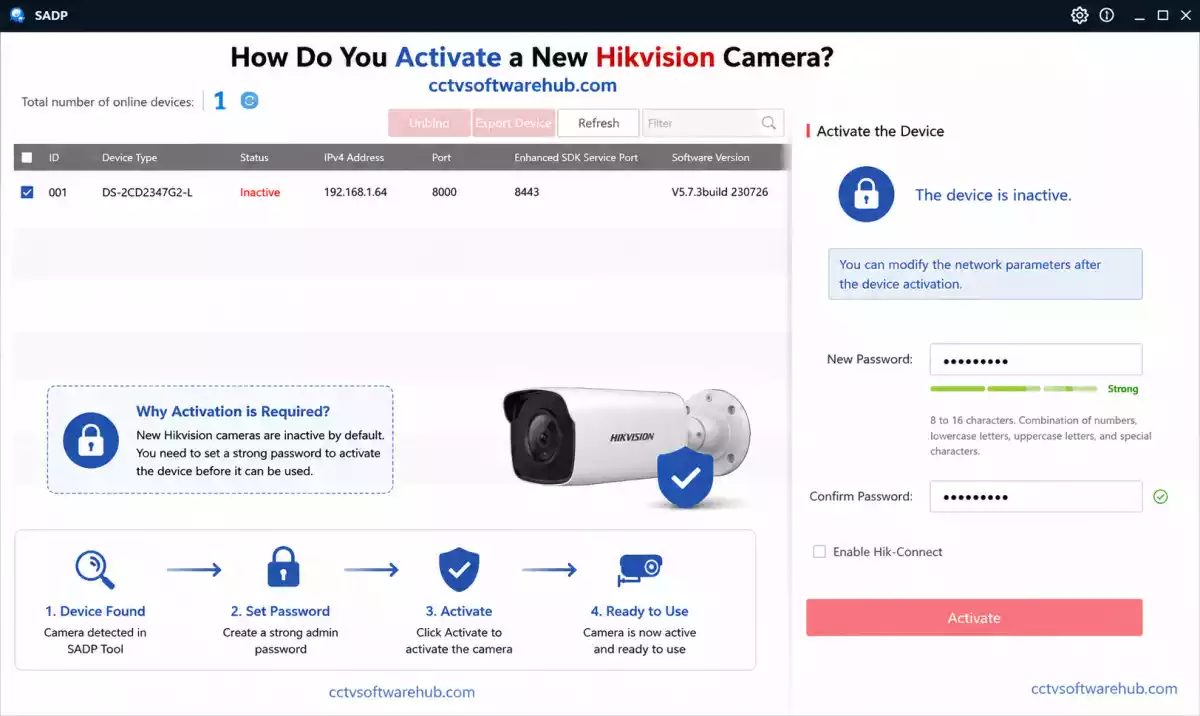
Brand-new Hikvision cameras ship in an Inactive state.
Before they can be used, you must activate them by creating an administrator password.
Fortunately, the SADP Tool makes this process very simple.
Step 1: Select the Inactive Device
Devices that haven’t been activated will display:
Inactive
under the Status column.
Click the device once.
Step 2: Create a Strong Password
The software will ask you to create an administrator password.
I recommend using:
- At least 8 characters
- Uppercase letters
- Lowercase letters
- Numbers
- Special characters
Example:
MyCamera@2026
Avoid using simple passwords like:
- 123456
- admin123
- password
Step 3: Confirm the Password
Enter the password again.
Double-check for typing mistakes.
Once activated, recovering a forgotten password requires additional verification.
Step 4: Click Activate
Press:
Activate
The process usually takes less than 10 seconds.
After activation, the device status changes from:
Inactive
to
Active
How Do You Change the IP Address Using the SADP Tool?
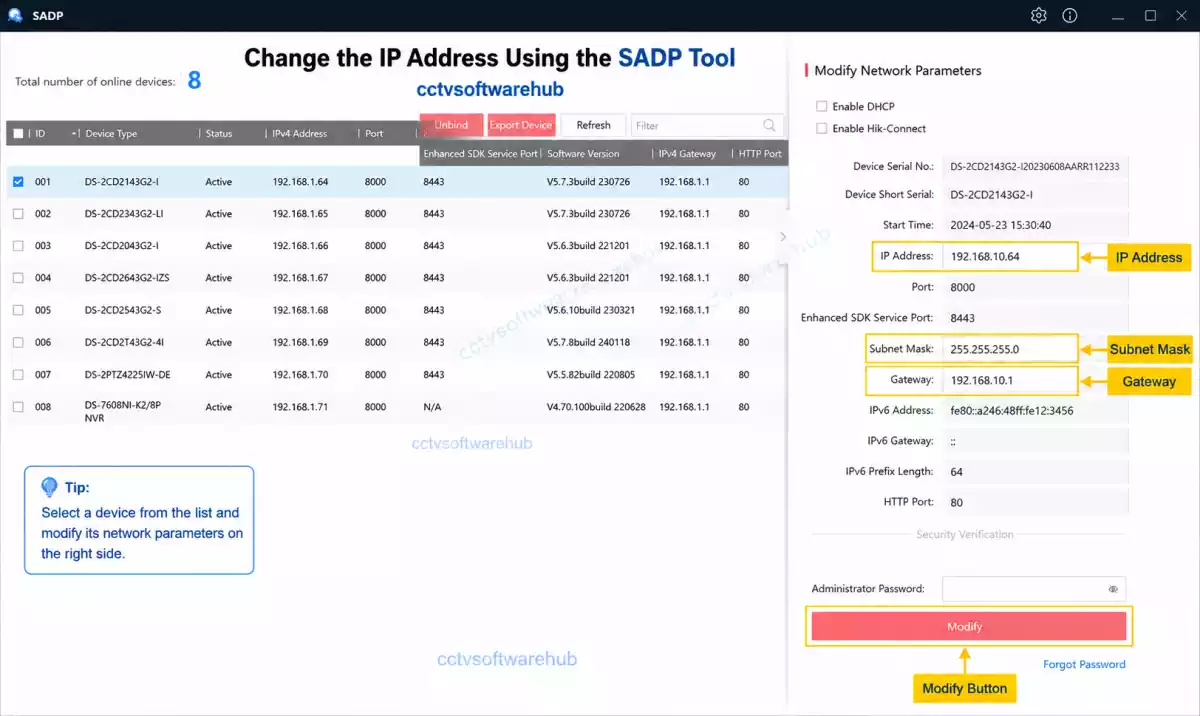
Changing the IP address is another feature I use almost every day.
It’s especially useful when:
- Multiple cameras have the same IP
- The camera is on a different subnet
- You’re installing several cameras
- The router uses a different network range
Step 1: Select the Camera
Click the device you want to modify.
Step 2: Enter Administrator Password
The software requires authentication before allowing network changes.
Enter the password you created during activation.
Step 3: Edit Network Settings
You can modify:
- IP Address
- Gateway
- Subnet Mask
- HTTP Port
Example:
Old IP
192.168.1.64
New IP
192.168.0.64
Step 4: Save the Changes
Click:
Modify
Within a few seconds, the device will restart with the new network settings.
Best Practice for Assigning IP Addresses
Instead of leaving cameras on random addresses, I follow a structured IP plan.
Example:
| Device | IP Address |
|---|---|
| NVR | 192.168.1.10 |
| Camera 1 | 192.168.1.101 |
| Camera 2 | 192.168.1.102 |
| Camera 3 | 192.168.1.103 |
| Camera 4 | 192.168.1.104 |
This makes future maintenance much easier.
Should You Use DHCP or a Static IP Address?
This is a question I get asked frequently.
DHCP
Advantages:
- Automatic configuration
- Quick setup
- Good for testing
Disadvantages:
- IP address may change after a router restart.
- Cameras can become unreachable if the address changes.
Static IP
Advantages:
- Permanent IP address
- Better for NVR recording
- Easier remote access
- More reliable for large installations
Disadvantages:
- Requires manual setup
My Recommendation: I always assign a static IP address to CCTV cameras. It prevents connectivity issues and makes future maintenance much easier.
How Do You Configure Multiple Cameras Faster?
If you’re installing several Hikvision cameras, configuring them one by one can be time-consuming.
Here’s the workflow I personally follow:
- Connect all cameras to the PoE switch.
- Wait for every camera to boot.
- Open the SADP Tool.
- Activate each camera.
- Assign sequential IP addresses.
- Verify firmware versions.
- Add the cameras to the NVR or iVMS-4200.
Using this method, I can configure multiple cameras much faster while reducing the chance of IP conflicts.
How Do You Export Device Information?
The SADP Tool also lets you export device details, which is especially useful for documentation or troubleshooting.
You can save information such as:
- Device Model
- Serial Number
- IP Address
- Firmware Version
- MAC Address
I often export this information before performing firmware upgrades or making major network changes. Having a record of the original configuration can save a lot of time if something goes wrong.
Can the SADP Tool Detect Devices from Other Brands?
No. The SADP Tool is designed specifically for Hikvision products and compatible OEM devices.
If you’re using cameras from brands like Dahua, CP Plus, Uniview, or TP-Link, they generally won’t appear in the SADP Tool.
For mixed-brand environments, you’ll need to use the manufacturer’s own discovery software or an ONVIF-compatible device manager.
Common Mistakes to Avoid While Using the SADP Tool
Over the years, I’ve noticed the same mistakes causing setup issues repeatedly. Avoiding these can save you a lot of troubleshooting time.
- Connecting the camera and PC to different networks.
- Forgetting to activate a new camera before trying to log in.
- Assigning duplicate IP addresses to multiple devices.
- Leaving cameras on DHCP in permanent installations.
- Ignoring firmware compatibility warnings.
- Closing the SADP Tool before the camera finishes rebooting after an IP change.
- Trying to configure devices while connected through a VPN.
My Tip: After making any network change, click Refresh and confirm the new IP address appears correctly before opening the camera in a web browser or adding it to your NVR.
This simple habit helps catch configuration mistakes immediately and avoids confusion later during installation.
How Do You Reset a Hikvision Device Password Using the SADP Tool?
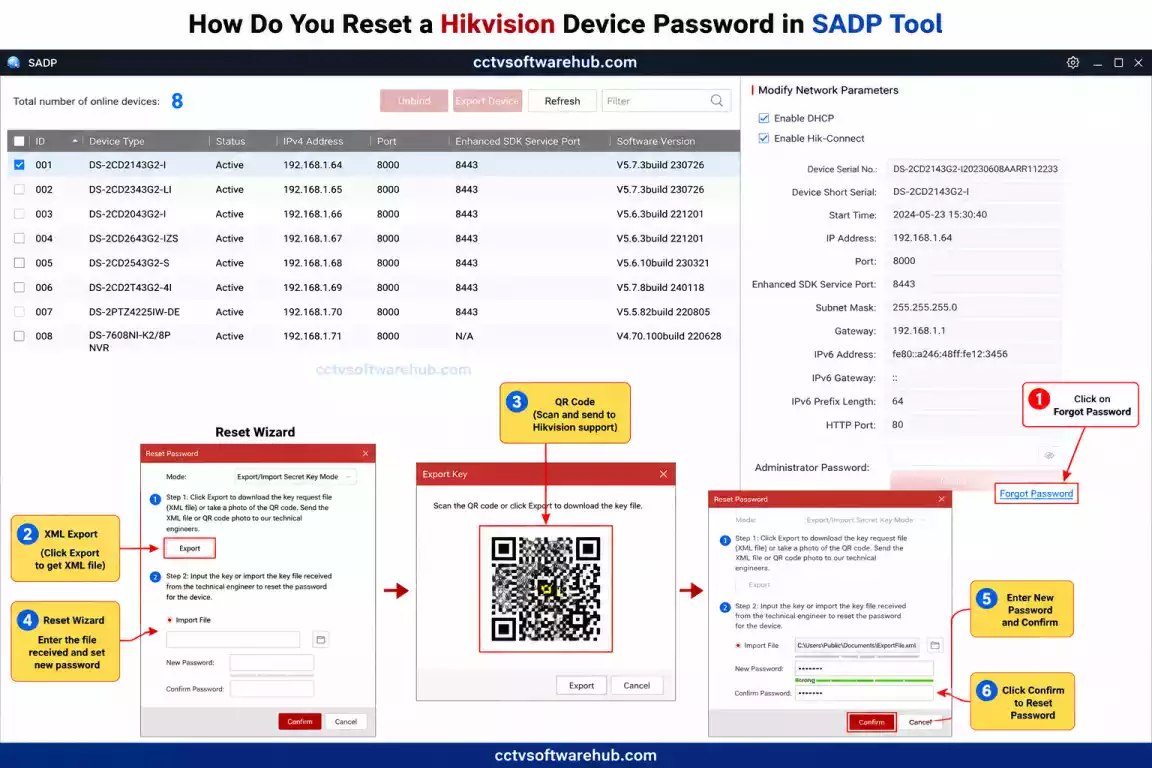
Forgetting the administrator password is one of the most common problems Hikvision users face. The good news is that the SADP Tool can help you start the password recovery process on supported devices.
However, it’s important to understand that the SADP Tool does not instantly remove or bypass passwords. Hikvision uses a secure verification process to prevent unauthorized access.
I’ve helped many users recover access to their cameras and NVRs, and in almost every case, the SADP Tool was the starting point.
When Should You Reset the Password?
You may need to reset the password if:
- You forgot the administrator password.
- You purchased a used Hikvision camera or NVR.
- The installer never shared the login credentials.
- The device has been unused for a long time.
- Multiple failed login attempts have locked the account.
Before You Begin
Make sure you have:
- The latest version of the SADP Tool.
- Your device connected to the same local network.
- Physical access to the device.
- The device’s serial number (if requested).
- Internet access (sometimes required for verification).
Step 1: Open the SADP Tool
Launch the application.
Wait until your Hikvision device appears in the list.
Select the device.
Step 2: Click “Forgot Password”
After selecting the device, click:
Forgot Password
The available recovery method depends on:
- Device model
- Firmware version
- Region
- Security settings
Step 3: Choose the Password Recovery Method
Depending on your device, you may see one of these options:
Method 1: Export XML File (Most Common)
The SADP Tool generates an encrypted XML file.
You’ll need to send this file to your Hikvision dealer or authorized support.
After verification, you’ll receive a reset file that can be imported back into the SADP Tool to create a new password.
This is the method I encounter most often on newer Hikvision devices.
Method 2: QR Code Verification
Some newer models display a QR code.
You scan the code using the appropriate Hikvision application or follow the instructions provided by Hikvision.
Once verified, you can create a new administrator password.
Method 3: Security Questions
If security questions were configured previously, you’ll be asked to answer them.
After successful verification, you can reset the password immediately.
Method 4: Verification Code
Some devices support verification through an email address or another configured recovery option.
Follow the on-screen instructions to complete the verification process.
Step 4: Create a New Password
Once your identity is verified, create a strong administrator password.
I recommend using:
- Minimum 8 characters
- Uppercase letters
- Lowercase letters
- Numbers
- Special characters
Avoid simple passwords like:
- admin
- 123456
- password
- hikvision123
Store the password in a secure password manager to avoid future lockouts.
Important Things to Know About Password Reset
Many websites claim that the SADP Tool can instantly remove passwords without verification.
This is not true.
Modern Hikvision devices use secure password protection, and bypassing it isn’t possible through legitimate software.
If a website promises a “one-click unlock” or “password bypass” tool, I recommend avoiding it, as it may contain malware or simply not work.
Why Is the SADP Tool Not Detecting My Camera?
This is probably the most common question I receive.
In most cases, the software itself isn’t the problem. The issue usually lies with the network, firewall, or device configuration.
Whenever the SADP Tool fails to detect a camera, I work through a simple checklist. Most problems can be resolved in just a few minutes.
1. Are the Camera and Computer on the Same Network?
The SADP Tool only discovers devices connected to the same Local Area Network (LAN).
For example:
Computer
192.168.1.100
Camera
192.168.1.64
These devices are on the same subnet and should communicate normally.
However, if your computer is on:
192.168.0.100
and the camera is on:
192.168.1.64
the software may not detect it until both devices are on the same network.
My Tip: Connect both the camera and your computer to the same router or PoE switch during the initial setup.
2. Is the Camera Powered On?
It sounds obvious, but I’ve seen this happen more times than I’d like to admit.
Check:
- Power adapter
- PoE switch
- Power injector
- Power LED
A camera without power won’t appear in the SADP Tool.
3. Is the Ethernet Cable Working?
A damaged or loose network cable can prevent communication.
Try:
- Replacing the cable.
- Using a different switch port.
- Testing with another known-working cable.
If the link LED doesn’t light up, start by checking the cable.
4. Is Windows Firewall Blocking the SADP Tool?
Windows Firewall may prevent the software from discovering devices.
To fix this:
- Open Windows Firewall.
- Locate the SADP Tool.
- Allow it on Private Networks.
- Restart the application.
This is one of the first things I check on a new computer.
5. Is a VPN Running?
VPN software can interfere with local network discovery.
Disconnect from:
- NordVPN
- ExpressVPN
- Surfshark
- OpenVPN
- WireGuard
Then restart the SADP Tool and scan again.
6. Is Npcap Installed Correctly?
The SADP Tool relies on Npcap to detect devices on the network.
If Npcap is missing or corrupted:
- Uninstall it.
- Download the latest version.
- Install it again.
- Restart your computer.
I’ve fixed several “No Devices Found” issues simply by reinstalling Npcap.
7. Has the Camera Finished Booting?
After powering on a Hikvision camera, it may take 30 to 90 seconds before it’s ready.
Be patient.
Click Refresh after waiting a minute.
8. Is the Device Already Active but Using an Unknown IP Address?
Sometimes the camera has already been configured with an IP address outside your current network range.
For example:
Camera
10.10.10.65
Computer
192.168.1.100
Although they’re physically connected, they can’t communicate until they’re on the same subnet.
The SADP Tool usually displays the camera’s current IP, allowing you to change it if authentication is successful.
9. Are Multiple Network Adapters Enabled?
If your computer has:
- Wi-Fi
- Ethernet
- Virtual adapters
- Hyper-V
- VMware
- VirtualBox
the SADP Tool may scan the wrong adapter.
Temporarily disable unused adapters and keep only the active network connection enabled.
10. Is Client Isolation Enabled on Your Router?
Some routers enable AP Isolation or Client Isolation, which prevents devices from communicating with each other.
Disable this feature temporarily while configuring your CCTV system.
SADP Tool Troubleshooting Checklist
| Problem | Possible Cause | Solution |
|---|---|---|
| No devices found | Different network | Connect PC and camera to the same LAN |
| Camera not detected | Firewall | Allow SADP through Windows Firewall |
| Device offline | Faulty Ethernet cable | Replace the cable |
| Scan returns empty | VPN enabled | Disconnect the VPN |
| Camera disappears | Duplicate IP address | Assign a unique static IP |
| Software crashes | Corrupted installation | Reinstall the SADP Tool |
| Camera won’t activate | Weak password | Create a stronger password |
| Password reset unavailable | Unsupported firmware | Update firmware or contact Hikvision support |
| Device missing after reboot | DHCP assigned a new IP | Use a static IP address |
Can You Download an Old Version of the SADP Tool?
Yes, older versions of the SADP Tool are available from some trusted sources and may be useful in specific situations.
For example, if you’re working with a legacy Hikvision camera that has very old firmware, an older version of the utility may provide better compatibility.
However, I generally recommend using the latest version unless you have a specific reason not to.
When Might an Old Version Be Useful?
- Configuring legacy Hikvision cameras.
- Maintaining older DVRs or NVRs.
- Working in environments where firmware cannot be upgraded.
- Troubleshooting compatibility with discontinued devices.
Risks of Using an Old Version
Older releases may:
- Lack support for new camera models.
- Miss important security updates.
- Be incompatible with the latest Windows versions.
- Not support modern password recovery methods.
My Recommendation: Start with the latest version. Only use an older release if you’re troubleshooting an older device and you’ve confirmed compatibility requirements.
Does the SADP Tool Work with Non-Hikvision Cameras?
No. The SADP Tool is designed for Hikvision devices and compatible OEM hardware.
If you use cameras from brands like Dahua, Uniview, Axis, or CP Plus, they generally won’t appear in the SADP Tool.
For those brands, it’s best to use the manufacturer’s official discovery tool or an ONVIF-compatible device manager.
My Troubleshooting Workflow
Whenever a Hikvision camera isn’t detected, I follow this order:
- Check power and Ethernet connection.
- Ensure the PC and camera are on the same network.
- Disable any VPN connection.
- Verify Windows Firewall permissions.
- Refresh the device list in the SADP Tool.
- Restart the camera and wait for it to boot.
- Reinstall Npcap if no devices are found.
- Restart the computer and scan again.
Following this workflow solves the vast majority of detection issues I encounter, whether I’m setting up a single home camera or a large commercial CCTV installation.
Does the SADP Tool Work on macOS?
Yes, Hikvision also provides a SADP Tool for Mac, allowing macOS users to discover and configure compatible Hikvision devices. Although the Windows version usually receives updates first, the Mac version includes the core features needed for most installations.
If you’re a Mac user, you can use the software to:
- Discover Hikvision cameras and NVRs on your local network.
- View device information.
- Activate new devices.
- Change IP addresses.
- Modify network settings.
- Start the password recovery process on supported devices.
For basic setup and troubleshooting, the macOS version performs well.
Should You Use the Mac or Windows Version?
If you have access to both platforms, I recommend using the Windows version because it generally receives new features and compatibility updates before macOS.
However, if you only use a Mac, the macOS version is more than capable of handling everyday configuration tasks.
What Is the Difference Between the SADP Tool, iVMS-4200, and HiTools Delivery?
Many beginners confuse these Hikvision applications because they all work with CCTV devices. In reality, each tool serves a different purpose.
| Software | Primary Purpose | Best For |
|---|---|---|
| SADP Tool | Device Discovery & IP Configuration | Initial setup and troubleshooting |
| iVMS-4200 | Live View & Device Management | Daily monitoring and management |
| HiTools Delivery | Batch Configuration & Deployment | Large-scale CCTV installations |
When Do I Use Each Tool?
I usually follow this workflow:
- Use the SADP Tool to find and activate the camera.
- Assign a static IP address.
- Add the camera to iVMS-4200 or the NVR.
- Use HiTools Delivery only when deploying multiple devices or performing advanced maintenance.
For most home users and small businesses, the SADP Tool is all you’ll need during the initial installation.
My Experience Using the SADP Tool
After working with CCTV systems for more than a decade, the SADP Tool is still one of the first applications I install on any new computer used for CCTV configuration.
I’ve used it while setting up:
- Home security systems
- Retail stores
- Offices
- Warehouses
- Schools
- Apartment buildings
In my experience, the software has saved countless hours by automatically detecting devices and simplifying network configuration.
One mistake I often see is users trying to access the camera through a web browser before knowing its IP address. Instead, I always start with the SADP Tool. Once I confirm the device is detected and properly configured, the rest of the installation becomes much easier.
The tool isn’t perfect—it only works with Hikvision devices, and password recovery still requires verification—but for what it’s designed to do, it performs exceptionally well.
If you’re installing or maintaining Hikvision cameras, I consider it an essential utility.
Pros and Cons
Pros
- Completely free to use.
- Official software from Hikvision.
- Quickly discovers devices on the local network.
- Makes IP configuration simple.
- Easy activation of new cameras.
- Supports password recovery workflow.
- Lightweight and easy to install.
- Compatible with Windows and macOS.
- Suitable for both beginners and professionals.
Cons
- Only works with Hikvision and compatible OEM devices.
- Cannot discover most third-party cameras.
- Password reset still requires official verification.
- Advanced deployment features are limited compared to HiTools Delivery.
My Rating
| Category | Rating |
|---|---|
| Ease of Installation | ⭐⭐⭐⭐⭐ (5/5) |
| Ease of Use | ⭐⭐⭐⭐⭐ (5/5) |
| Device Discovery | ⭐⭐⭐⭐⭐ (5/5) |
| IP Configuration | ⭐⭐⭐⭐⭐ (5/5) |
| Password Recovery | ⭐⭐⭐⭐☆ (4.5/5) |
| Windows Compatibility | ⭐⭐⭐⭐⭐ (5/5) |
| macOS Compatibility | ⭐⭐⭐⭐☆ (4.5/5) |
| Overall Rating | 4.9/5 |
Why I Gave It 4.9/5
The SADP Tool excels at exactly what it was designed for: discovering and configuring Hikvision devices. It’s lightweight, reliable, and easy to use, making it an essential tool for installers and anyone managing Hikvision CCTV systems.
The only reason it doesn’t receive a perfect score is that it’s limited to Hikvision products and the password reset process still depends on official verification.
Final Verdict
If you own a Hikvision IP camera, DVR, or NVR, downloading the SADP Tool should be one of your first steps. It simplifies device discovery, activation, IP address configuration, and troubleshooting, making the entire setup process much easier.
I personally use it before opening a web browser or adding devices to an NVR because it quickly confirms whether the camera is detected, activated, and correctly configured.
Whether you’re installing your first security camera or maintaining a large surveillance system, the SADP Tool remains one of the most useful free utilities available for Hikvision users.
Frequently Asked Questions
What is the SADP Tool used for?
The SADP Tool is used to discover, activate, and configure Hikvision devices on a local network.
I use it whenever I need to find the IP address of a new camera, activate a device, change its network settings, or begin the password recovery process. It saves a lot of time compared to manually searching for devices.
Is the SADP Tool free to download?
Yes, the SADP Tool is completely free to download and use.
Hikvision provides it as a free utility for configuring and managing compatible devices. You don’t need to purchase a license or subscription.
Can I use the SADP Tool on Windows 11?
Yes, the latest version fully supports Windows 11.
I’ve used it on Windows 11 without any issues. Just make sure Windows Firewall allows the application and that your computer is connected to the same network as your Hikvision device.
Where can I download the latest version of the SADP Tool?
You can download the latest version from the download section on this page or verify the newest release on Hikvision’s official website.
I recommend using the latest version because it includes compatibility improvements, bug fixes, and support for newer Hikvision devices.
How do I find the IP address of my Hikvision camera?
Open the SADP Tool, wait for the network scan to complete, and check the IP Address column.
This is much faster than searching through your router settings or using a generic IP scanner. Whenever I install a new camera, this is the first method I use.
Why is the SADP Tool not detecting my camera?
The most common causes are network issues, firewall restrictions, or the camera not being connected to the same LAN.
Start by checking the power supply, Ethernet cable, Windows Firewall, VPN connection, and whether both your computer and camera are connected to the same router or switch. In my experience, these simple checks solve most detection problems.
Can I change the IP address using SADP?
Yes, the SADP Tool lets you change the IP address, subnet mask, gateway, and other network settings.
After selecting the device and entering the administrator password, you can update the network configuration directly from the software. I recommend assigning a static IP address to avoid future connectivity issues.
How do I reset a Hikvision device password using the SADP Tool?
Select the device, click “Forgot Password,” and follow the verification process provided by Hikvision.
Depending on your device model and firmware, you may need to export an XML file, scan a QR code, or complete another verification method before creating a new password. The SADP Tool starts the process, but Hikvision’s security verification is required to protect your device.
Can the SADP Tool detect devices connected through Wi-Fi?
Yes, as long as the computer and the Hikvision device are connected to the same local network.
Whether your PC is connected through Ethernet or Wi-Fi doesn’t matter. The important part is that both devices are on the same LAN and there are no firewall or network isolation restrictions.
Does the SADP Tool require an internet connection?
No, the SADP Tool works on your local network and does not require internet access for device discovery or IP configuration.
However, internet access may be needed when downloading the software, checking for updates, or completing certain password recovery methods.
Is it better to use DHCP or a static IP address?
For permanent CCTV installations, I recommend using a static IP address.
A static IP prevents the camera’s address from changing after a router restart, making it easier to access the device and ensuring reliable communication with your NVR.
Conclusion
The SADP Tool Download is more than just an IP scanner—it’s an essential utility for anyone using Hikvision CCTV equipment. From discovering new devices and activating cameras to changing IP addresses and assisting with password recovery, it simplifies every stage of the installation process.
Throughout my years of working with CCTV systems, this has been one of the most reliable tools in my toolkit. It’s lightweight, free, easy to use, and designed specifically for Hikvision products. If you’re setting up a new camera or troubleshooting an existing installation, I strongly recommend keeping the latest version of the SADP Tool on your computer. It will save you time, reduce frustration, and make managing your Hikvision devices much easier.
After configuring your camera, you may also find these guides useful: