
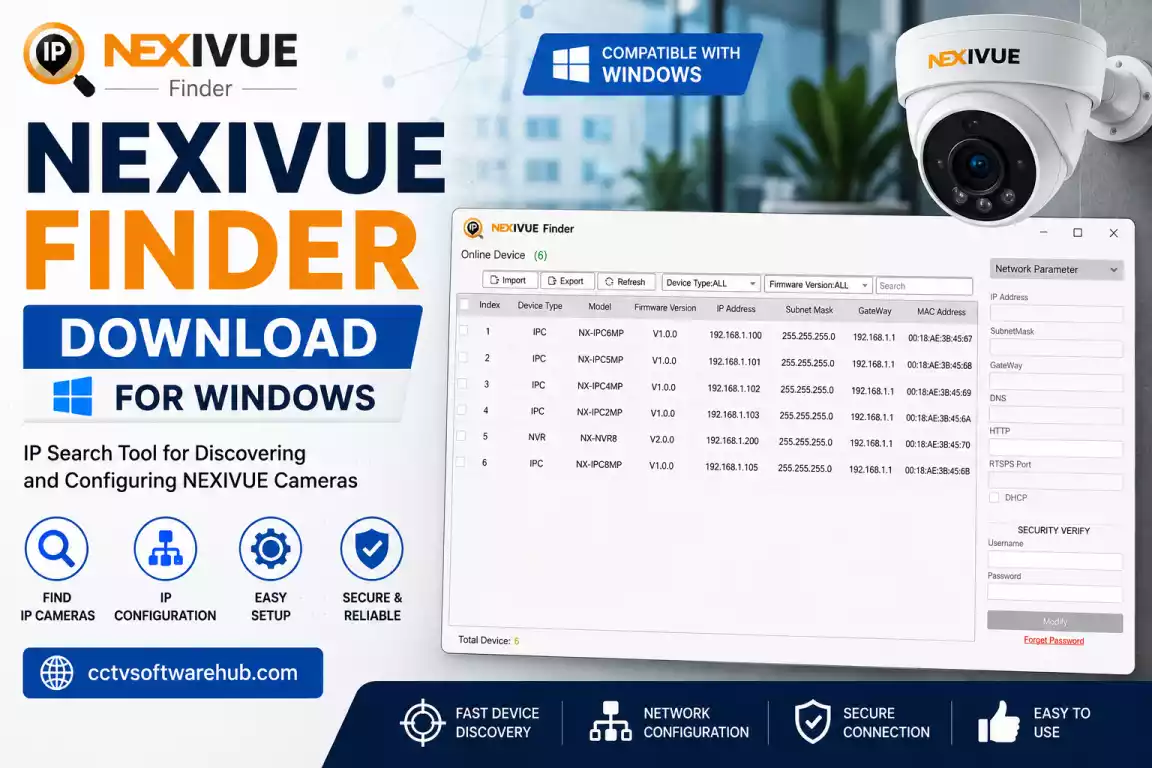
Looking for Nexivue Finder download? Nexivue Finder is the official NEXIVUE IP Search Tool used to discover compatible cameras on a local network and configure their network settings. NEXIVUE lists Nexivue Finder as version V1.00 in its official Software section.
In this guide, I will show you how to download Nexivue Finder for PC, install it on Windows, find a NEXIVUE IP camera, check its IP address, change the network configuration, and troubleshoot the most common detection problems.
If you have recently installed a NEXIVUE IP camera, you may run into a common problem: the camera is powered on and connected to the network, but you do not know its IP address.
This is where Nexivue Finder becomes useful.
Nexivue Finder is designed to search for NEXIVUE devices on a local network and provide information such as the device type, IP address, and firmware version. It can also be used for network configuration, including IP address, subnet mask, gateway, and DHCP settings.
I created this guide to make the entire process easier, especially if you are setting up a NEXIVUE camera for the first time.
Where Can You Download Nexivue Finder ?
I recommend downloading Nexivue Finder from the official NEXIVUE Software page whenever possible. For convenience, I have also provided a direct download option below, giving you quick access to the Windows installer.
NEXIVUE identifies Finder as an IP Search Tool designed to search for and configure compatible cameras on a local area network.
| Software | Supported OS | Version | Download |
|---|---|---|---|
| Nexivue Finder Download | Windows 10 / 11 | V1.00 | ⬇ Download |
| Nexivue Finder official link | Windows 10 / 11 | V1.00 | ⬇Official Download |
Nexivue Finder Download Information
| Software Information | Details |
|---|---|
| Software Name | Nexivue Finder |
| Version | V1.00 |
| Software Type | IP Search Tool |
| Developer | NEXIVUE |
| Platform | Windows PC |
| Primary Purpose | IP camera discovery and configuration |
| Network | Local Area Network |
| Camera Discovery | Yes |
| IP Configuration | Yes |
| Default Factory IP | 192.168.1.100 |
What Is Nexivue Finder?
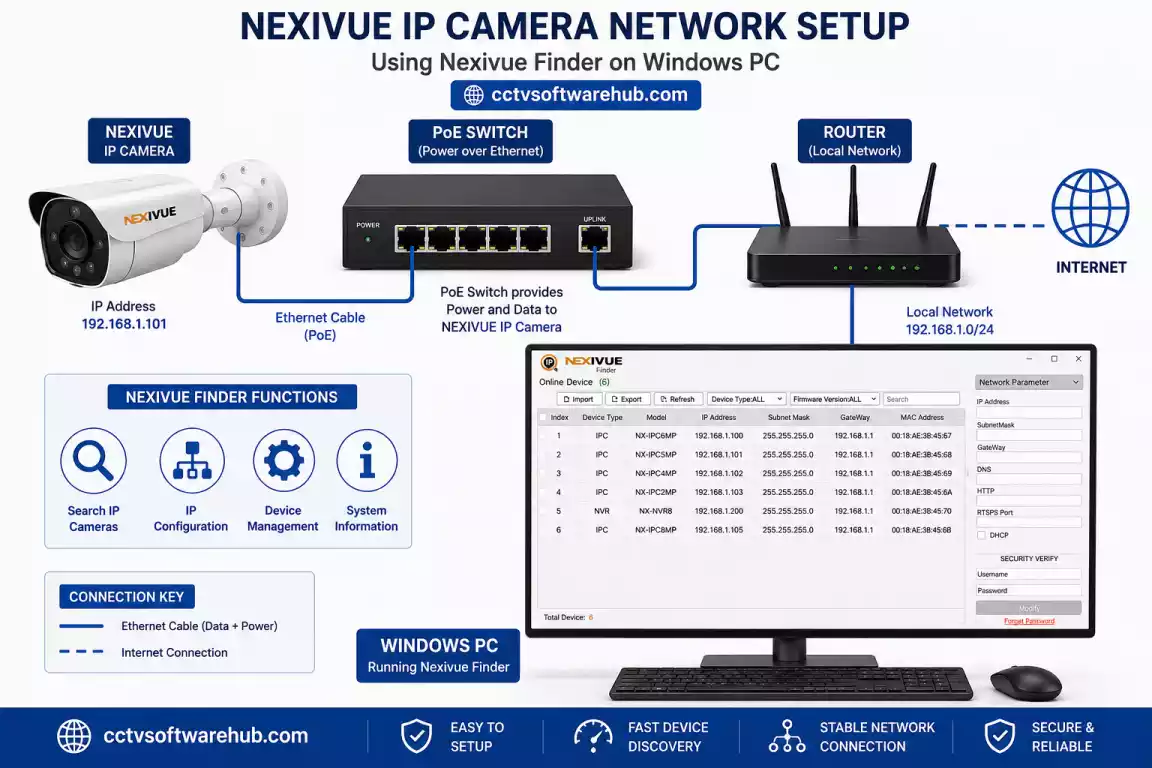
Nexivue Finder is an official NEXIVUE IP Search Tool used to discover and configure compatible NEXIVUE devices on a local network.
In simple terms, I would describe it as a camera discovery and IP configuration utility.
The main purpose of the software is to help you find a NEXIVUE camera when you do not know its current IP address.
For example, imagine that I connect a NEXIVUE camera to a PoE switch.
The camera powers on.
The Ethernet connection is active.
The switch shows a network link.
But I do not know which IP address the camera is using.
Instead of manually trying different IP addresses, I can use Nexivue Finder to search the local network.
Once the camera appears, I can check its network information and configure the IP settings when required.
What Information Can Nexivue Finder Display?
Nexivue Finder can provide device-related information such as:
- Device type
- IP address
- Firmware version
- Network information
- Available configuration options
The software is therefore particularly useful during the initial setup and troubleshooting of an IP camera.
What Is Nexivue Finder Used For?
Nexivue Finder is mainly used for NEXIVUE camera discovery, IP address identification, and network configuration.
I find this type of tool most useful during the installation stage.
Can Nexivue Finder Find a NEXIVUE Camera?
Yes.
Finder is designed to search the local network for compatible NEXIVUE devices.
This means I do not have to know the camera’s IP address before starting the discovery process.
Can Nexivue Finder Show the Camera IP Address?
Yes.
Once the camera is discovered, the device information can include its current IP address.
This is especially useful when the camera was previously configured or received an address through DHCP.
Can Nexivue Finder Change the Camera IP Address?
Yes.
The NEXIVUE documentation describes the ability to modify network settings, including the IP address, subnet mask, and gateway.
Administrator authentication may be required before making these changes.
Can Nexivue Finder Configure DHCP?
Yes.
DHCP is included as part of the documented network configuration options.
This allows the camera to receive its IP address from a DHCP server on the network.
Is Nexivue Finder a CCTV Monitoring Application?
No.
I would not use Nexivue Finder as the primary application for live CCTV monitoring.
Its main purpose is device discovery and network configuration.
For regular live viewing, playback, alerts, and remote monitoring, you would use the appropriate NEXIVUE client or mobile application.
What Features Does Nexivue Finder Provide?
Nexivue Finder is a focused utility rather than a complete CCTV management platform.
| Feature | Availability |
|---|---|
| NEXIVUE camera discovery | Yes |
| IP camera search | Yes |
| IP address identification | Yes |
| LAN device discovery | Yes |
| Device information | Yes |
| Firmware information | Yes |
| IP configuration | Yes |
| Subnet mask configuration | Yes |
| Gateway configuration | Yes |
| DHCP configuration | Yes |
| Initial network setup | Yes |
| Live CCTV monitoring | Not its primary purpose |
| Mobile monitoring | No |
The biggest benefit is that the software can help identify NEXIVUE devices on your local network without requiring you to manually guess their IP addresses.
What Should You Check Before Installing Nexivue Finder?
Before opening the software, I recommend checking the physical network connection first.
This can prevent unnecessary software troubleshooting.
Is the NEXIVUE Camera Powered?
Make sure the camera is receiving power.
If your camera uses PoE, check the PoE switch or NVR PoE port.
If there is no power, Nexivue Finder will not be able to discover the camera.
Is the Ethernet Cable Connected?
Check the Ethernet cable between the camera and switch.
If possible, test the cable with another known-good cable.
A faulty cable can make a perfectly working camera appear to be a software problem.
Is Your Windows PC Connected to the Same Network?
For initial configuration, I recommend connecting the Windows PC to the same local network as the camera.
A simple configuration looks like this:
NEXIVUE Camera → PoE Switch → Windows PC
Once the camera is successfully discovered, you can reconnect the rest of your network equipment.
Is Your PC Using the Correct IPv4 Network?
The NEXIVUE documentation recommends ensuring that the computer’s IPv4 address is on the same network segment as the camera.
For example:
PC: 192.168.1.50
Camera: 192.168.1.100
Subnet Mask: 255.255.255.0
These addresses are normally on the same local network.
If the PC is using:
192.168.10.50
while the camera is:
192.168.1.100
you may have a subnet mismatch.
How Do You Download Nexivue Finder for PC?
You can download Nexivue Finder by visiting the official NEXIVUE Software page and selecting Nexivue Finder from the available software list. NEXIVUE provides the tool as an IP Search Tool for discovering and configuring compatible cameras on a local network.
For easier access, I have also included a direct download option Above, so you can download the Nexivue Finder installer without navigating through multiple pages.
How Do You Install Nexivue Finder on Windows?
You can install Nexivue Finder on Windows by opening the downloaded installer and following the installation wizard.
The exact screens can vary depending on the installer package, so I recommend following the options displayed by your version rather than relying on screenshots from another release.
Step 1: Open the Downloads Folder
Open your Windows Downloads folder.
Locate the Nexivue Finder installer.
Step 2: Start the Installer
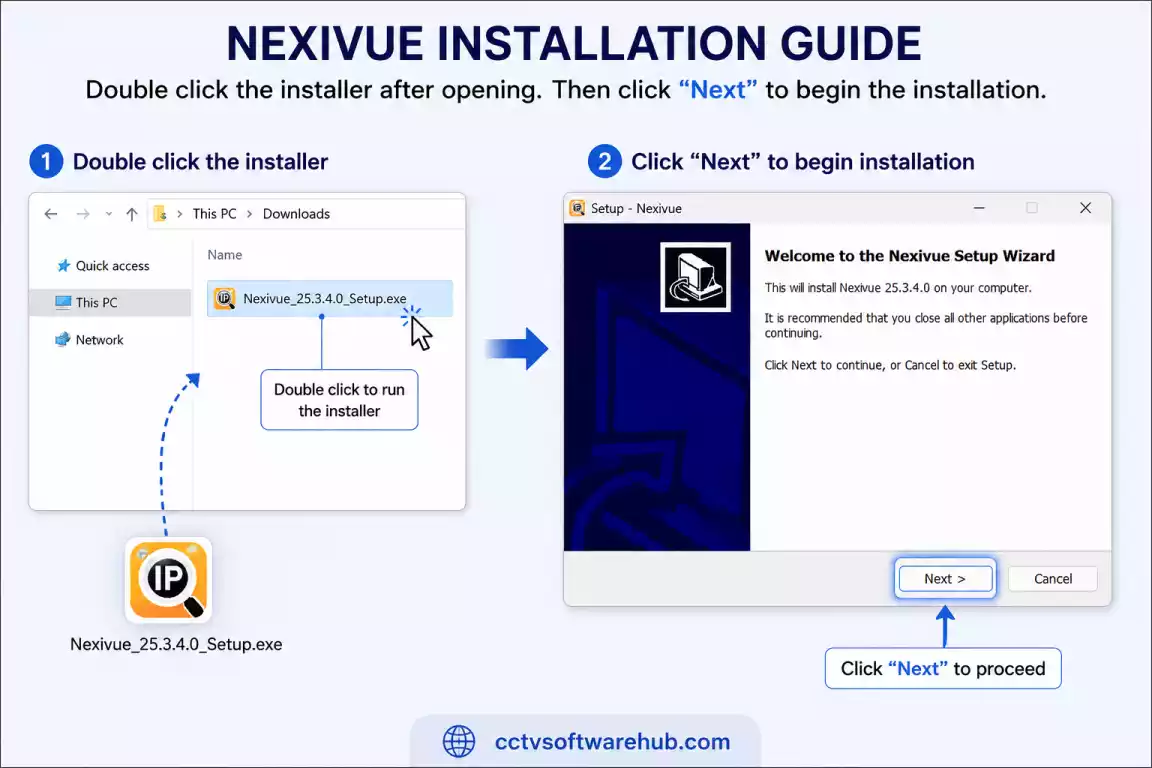
Double-click the installer.
If Windows displays a User Account Control prompt, verify that you are opening the correct installer before allowing it to run.
Step 3: Follow the Installation Wizard
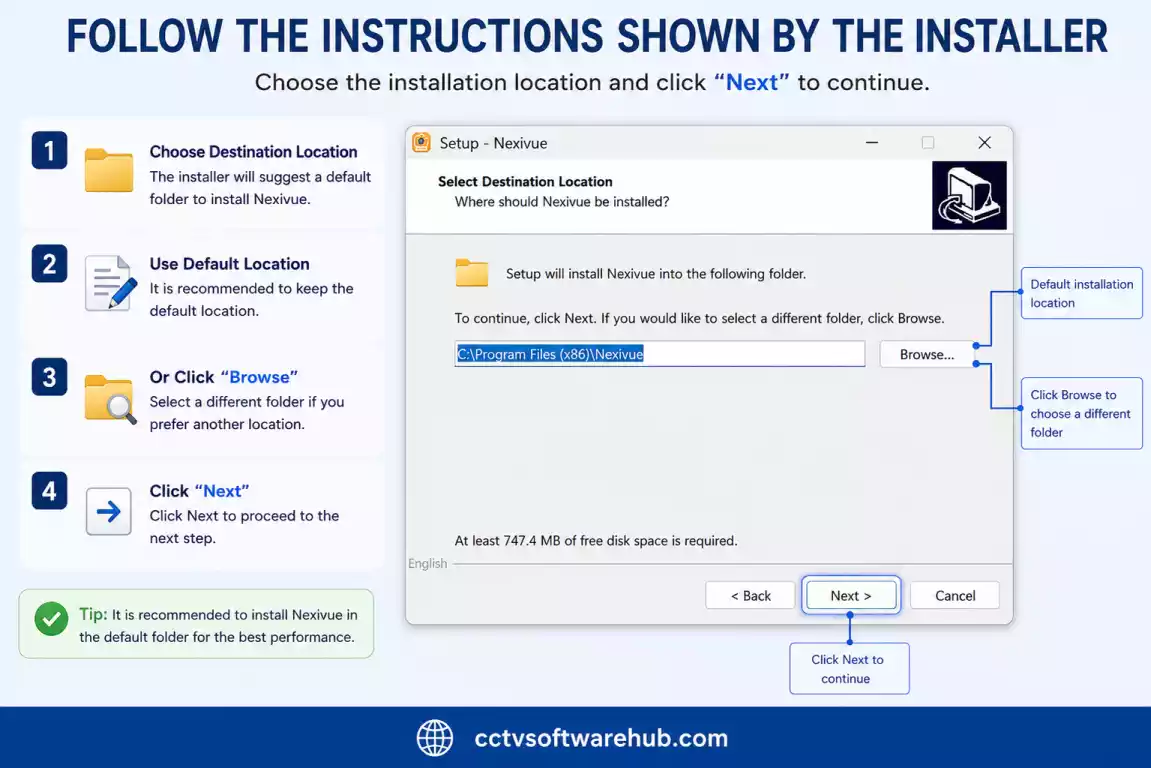
Follow the instructions shown by the installer.
If it asks for an installation location, the default location is normally suitable.
Step 4: Complete Installation
Wait for the installation to finish.
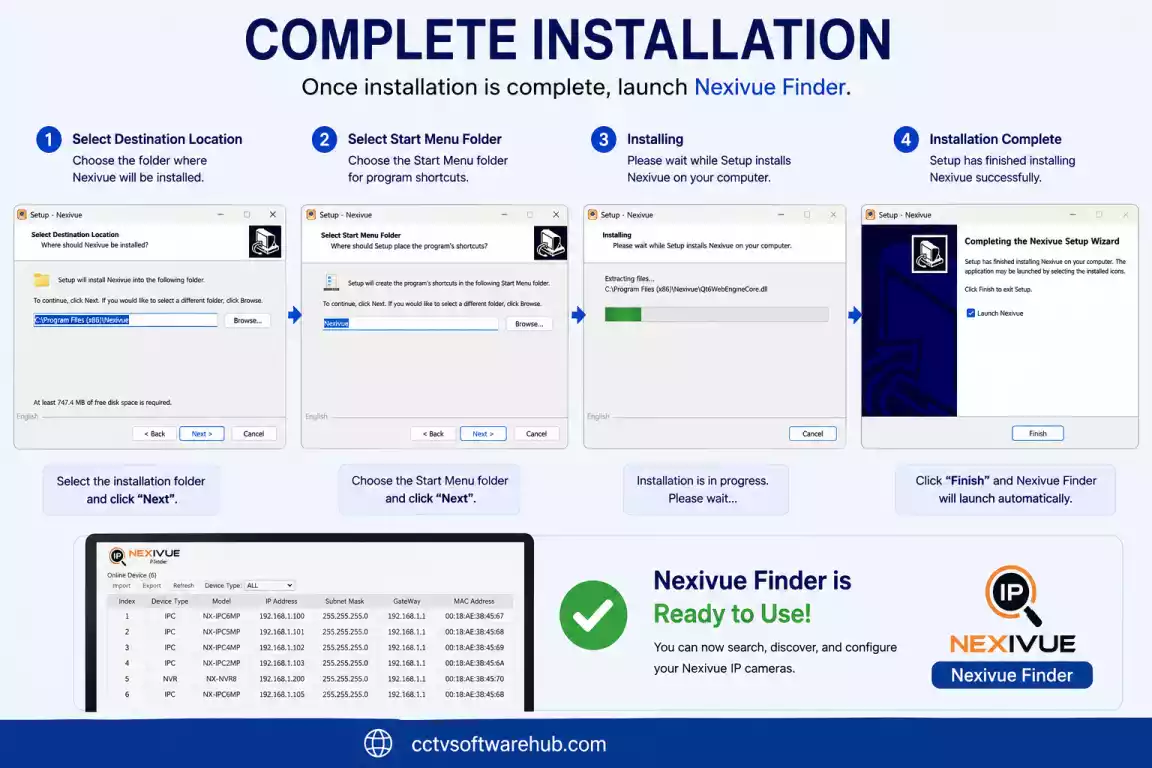
Once installation is complete, launch Nexivue Finder.
Step 5: Connect the Camera
Connect the NEXIVUE camera to the same LAN as the Windows computer.
Step 6: Start Device Discovery
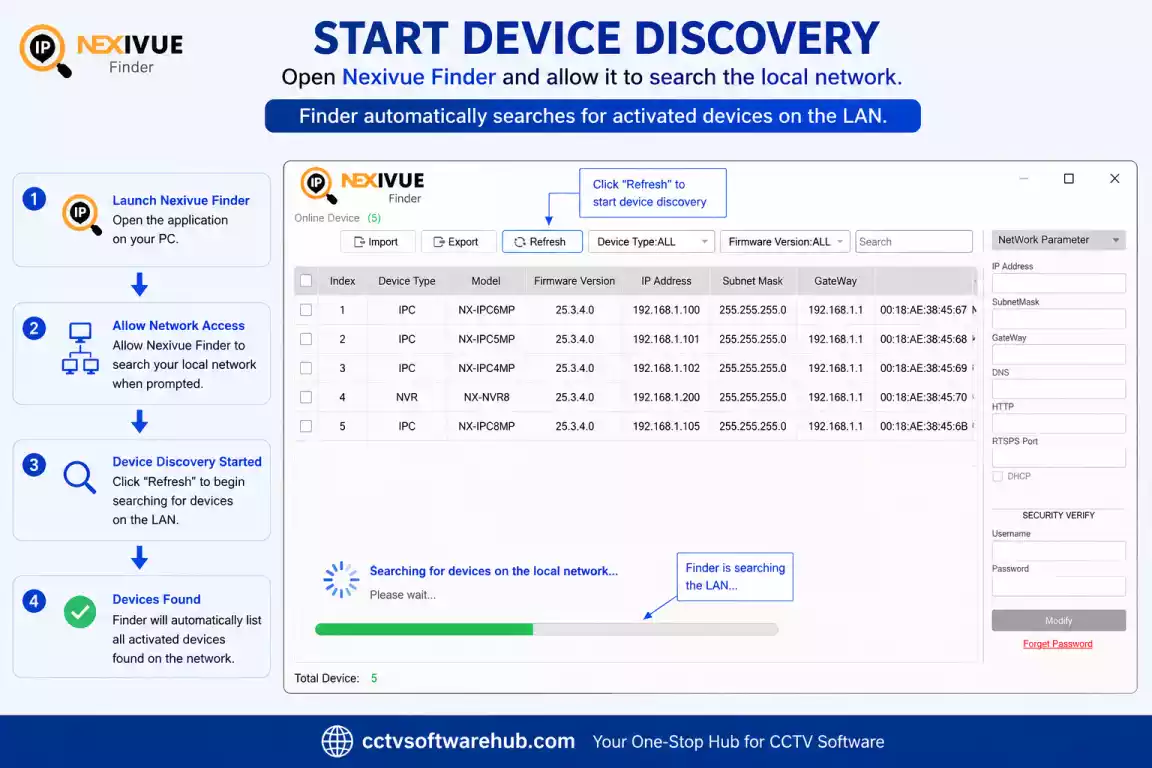
Open Nexivue Finder and allow it to search the local network.
The official NEXIVUE documentation states that Finder automatically searches for activated devices on the LAN.
How Do You Find a NEXIVUE Camera With Finder?
Connect the camera and Windows PC to the same LAN, open Nexivue Finder, and allow the software to search for compatible devices.
This is the primary reason users search for terms such as Nexivue camera finder, Nexivue IP camera finder, and Nexivue camera discovery tool.
Step 1: Connect the Camera
Connect the camera to your PoE switch or network.
Step 2: Connect Your PC
Connect the Windows computer to the same local network.
For initial configuration, I prefer Ethernet over Wi-Fi whenever possible.
Step 3: Open Nexivue Finder
Launch the installed application.
Step 4: Let Finder Search the LAN
Wait for the device list to populate.
The official documentation describes automatic LAN device searching.
Step 5: Identify Your Camera
Check the information shown in the device list.
Look for the appropriate device type, IP address, and firmware information.
Step 6: Record the Current Settings
Before changing anything, I recommend recording:
- IP address
- Subnet mask
- Gateway
- Firmware version
- Device information
This information can be extremely useful later.
What Is the Default IP Address of a NEXIVUE Camera?
The documented factory default IP address of a NEXIVUE camera is 192.168.1.100.
This is one of the most useful details to know during initial NEXIVUE camera setup.
However, I would not assume that every camera is currently using this address.
A previously configured camera may have:
- A static IP address
- A DHCP address
- A different subnet
- Network settings changed by an installer
For this reason, Nexivue Finder is more useful than simply trying the default IP address.
Example of a Basic Factory Network
A typical initial configuration could look like:
| Device | Example Address |
|---|---|
| NEXIVUE Camera | 192.168.1.100 |
| Windows PC | 192.168.1.50 |
| Subnet Mask | 255.255.255.0 |
These are example values.
Always configure the computer and camera according to your actual network.
How Do You Change a NEXIVUE Camera IP Address?
You can change a compatible NEXIVUE camera’s IP address through Nexivue Finder by selecting the device, authenticating with the administrator password, and changing the network settings.
Step 1: Find the Camera
Launch Nexivue Finder and locate the camera.
Step 2: Select the Correct Device
Select the camera you want to configure.
If multiple devices appear, carefully verify that you have selected the correct one.
Step 3: Enter Administrator Credentials
The NEXIVUE documentation indicates that administrator authentication is required for network configuration.
Step 4: Enter the New IP Address
Enter the IP address appropriate for your network.
For example:
| Setting | Example |
|---|---|
| IP Address | 192.168.1.53 |
| Subnet Mask | 255.255.255.0 |
| Gateway | 192.168.1.1 |
These values are examples only.
Step 5: Apply the Settings
Apply the new configuration.
The camera may temporarily disappear because its IP address has changed.
Step 6: Search Again
Run the Finder search again.
Check whether the camera now appears with the new address.
Why Should You Avoid Duplicate IP Addresses?
Never assign an address that another device already uses.
For example, if another camera is using:
192.168.1.53
do not assign the same address to another camera.
Duplicate IP addresses can cause:
- Camera disconnections
- NVR connection problems
- Intermittent access
- Unstable network communication
How Do You Configure NEXIVUE Camera Network Settings?
Configure the camera with an IP address, subnet mask, and gateway that match your local network, or use DHCP when appropriate.
What Is a Static IP Address?
A static IP is manually assigned to the camera.
For a permanent CCTV installation, I prefer keeping a documented IP-address plan.
For example:
| Camera | IP Address | Location |
|---|---|---|
| Camera 01 | 192.168.1.51 | Main Gate |
| Camera 02 | 192.168.1.52 | Parking |
| Camera 03 | 192.168.1.53 | Reception |
| Camera 04 | 192.168.1.54 | Warehouse |
What Is DHCP?
DHCP allows a router or DHCP server to automatically assign an IP address to the camera.
This can make initial setup easier.
However, the assigned address may change later unless you use a DHCP reservation.
Should You Use Static IP or DHCP?
For permanent CCTV installations, I prefer either:
- A properly documented static IP system, or
- DHCP reservations
For temporary testing, DHCP can be convenient.
The important thing is to know which method your network is using.
How Do You Set Up a NEXIVUE Camera for the First Time?
For initial NEXIVUE camera setup, connect the camera to the LAN, initialize it, discover it with Finder, configure its IP address, and then add it to your NVR or client software.
Recommended NEXIVUE Camera Setup Process
Step 1: Power the camera
Connect the correct power source or PoE connection.
Step 2: Connect Ethernet
Connect the camera to the network.
Step 3: Connect the Windows PC
Connect the computer to the same local network.
Step 4: Install Nexivue Finder
Install the software using the verified installer.
Step 5: Discover the camera
Open Finder and search the LAN.
Step 6: Initialize the camera
If the camera requires initialization, follow the manufacturer’s instructions and create the required administrator password.
Step 7: Configure the IP address
Assign the camera an address appropriate for your network.
Step 8: Test the connection
Verify that the camera is accessible on the LAN.
Step 9: Add the camera to the NVR
Add the camera using the appropriate network credentials and settings.
Step 10: Test live view and recording
Make sure the NVR receives video and records correctly.
Why Is Nexivue Finder Not Detecting My Camera?
If Nexivue Finder is not detecting your camera, check the camera power, Ethernet connection, PC network, subnet configuration, initialization status, firewall, and network adapters.
I recommend troubleshooting in the following order.
1. Check Camera Power
Confirm that the camera is receiving power.
If it uses PoE, check the PoE switch port.
2. Check the Ethernet Cable
Replace the cable with a known-good cable if necessary.
3. Check the Switch Port
Make sure the Ethernet switch port is active.
4. Check the PC IP Address
Make sure the Windows computer is using an IP address compatible with the camera.
5. Check the Subnet
The PC and camera should normally be on the same network segment during initial configuration.
6. Check Camera Initialization
If the camera is not initialized, complete the manufacturer’s initialization procedure.
7. Disable VPN Temporarily
If your PC is connected to a VPN, disconnect it temporarily while troubleshooting the local camera network.
8. Check Multiple Network Adapters
A Windows PC may have several network adapters:
- Ethernet
- Wi-Fi
- VPN
- Hyper-V
- VirtualBox
- Other virtual adapters
For initial testing, I prefer using one active Ethernet connection.
9. Check Windows Firewall
Check whether Windows Firewall or security software is preventing the application from communicating with the local network.
I do not recommend permanently disabling Windows Firewall.
10. Check for an IP Conflict
If you believe the camera is using 192.168.1.100, check whether another device already uses that address.
11. Simplify the Network
If Finder still cannot find the camera, temporarily use:
Camera → PoE Switch → Windows PC
This removes unnecessary routing and network complexity.
Does Nexivue Finder Work Without Internet?
Yes. Nexivue Finder can perform local device discovery without requiring an internet connection.
Finder searches for devices on the local network.
For example:
NEXIVUE Camera → Ethernet Switch → Windows PC
can provide the local connection required for camera discovery.
Internet access may be required for separate functions such as:
- Remote monitoring
- Cloud services
- Online updates
- Internet-based resources
But local IP camera discovery itself does not inherently require internet access.
Is Nexivue Finder the Same as the Nexivue Mobile App?
No. Nexivue Finder and the Nexivue mobile app are different tools.
Finder is mainly designed for local camera discovery and network configuration.
The mobile application is designed for surveillance functions such as live viewing, playback, alerts, device management, and remote access.
| Function | Nexivue Finder | Nexivue Mobile App |
|---|---|---|
| Windows PC | Yes | No |
| Camera discovery | Yes | Not its primary purpose |
| IP configuration | Yes | Not its primary purpose |
| IP troubleshooting | Yes | Limited |
| Live viewing | Not its primary purpose | Yes |
| Playback | Not its primary purpose | Yes |
| Remote monitoring | Not its primary purpose | Yes |
| Mobile notifications | No | Yes |
If I am installing a camera and don’t know its IP address, I would use Finder first.
If the camera is already configured and I want to monitor it from my phone, I would use the mobile application.
Can You Use Nexivue Finder Without a Router?
Yes. A router is not necessarily required for basic local camera discovery.
A simple local network can be enough.
For example:
NEXIVUE Camera → Ethernet Switch → Windows PC
The important requirement is that the camera and PC can communicate over the local network.
A router becomes important when you need communication between different networks, internet access, or remote connectivity.
Can You Access a NEXIVUE Camera Through a Web Browser?
Yes, NEXIVUE documentation provides browser-based access to supported IP cameras.
The main challenge is knowing the camera’s IP address.
This is where Finder becomes useful.
For example, if Finder identifies the camera as:
192.168.1.50
you can use that address for supported browser-based camera access.
What Should You Do After Changing the Camera IP Address?
After changing the camera IP address, search for the device again, verify connectivity, and update your NVR configuration if necessary.
I recommend this process:
- Record the new IP address.
- Run Finder again.
- Confirm the camera appears.
- Test local connectivity.
- Access the camera if supported.
- Update the NVR.
- Test live video.
- Test recording.
Do not assume that changing the camera IP automatically updates the NVR.
If the NVR still points to the old address, the camera may appear offline.
How Does Nexivue Finder Compare With Other CCTV IP Tools?
Nexivue Finder is designed for NEXIVUE devices, while other CCTV manufacturers provide their own discovery and configuration utilities.
I recommend using the manufacturer’s own tool whenever it is available.
For example, CCTV Software Hub also covers other manufacturer utilities.
If you work with Dahua cameras, see my Dahua Config Tool guide.
If you work with Hikvision devices, see my HiTools Delivery guide.
If you need Hikvision PC client software, see my iVMS 4200 Download guide.
This creates a useful distinction:
| CCTV Brand | Example Configuration Tool |
|---|---|
| NEXIVUE | Nexivue Finder |
| Dahua | Dahua Config Tool |
| Hikvision | Hikvision configuration tools |
| Other brands | Manufacturer-specific tools |
I would not recommend treating Nexivue Finder as a universal IP scanner for every CCTV brand.
Its strongest purpose is NEXIVUE device discovery and configuration.
How Should You Plan IP Addresses for Multiple NEXIVUE Cameras?
Create a documented IP-address plan before configuring multiple cameras.
For example:
| Device | IP Address | Location |
|---|---|---|
| NEXIVUE Camera 01 | 192.168.1.51 | Main Gate |
| NEXIVUE Camera 02 | 192.168.1.52 | Parking |
| NEXIVUE Camera 03 | 192.168.1.53 | Reception |
| NEXIVUE Camera 04 | 192.168.1.54 | Warehouse |
| NEXIVUE NVR | 192.168.1.10 | Security Room |
The actual addresses should match your network.
I recommend keeping a record of:
- Camera name
- Location
- IP address
- MAC address
- NVR channel
- Installation date
- Notes
This becomes extremely useful when troubleshooting the system months or years later.
How Can You Plan Bandwidth for Multiple NEXIVUE Cameras?
Camera count and bitrate are two important factors when estimating CCTV network bandwidth.
For example, if eight cameras each use approximately 4 Mbps:
8 × 4 Mbps = 32 Mbps
That is the approximate camera-stream traffic.
Your network may also carry:
- NVR traffic
- Live viewing
- Playback
- Management traffic
- Other network devices
- Future camera expansion
For larger installations, I recommend leaving additional network capacity instead of designing the network around its maximum theoretical limit.
You can use my IP Camera Bandwidth Calculator to estimate the bandwidth required for an IP camera system.
You can also use my CCTV Storage Calculator when planning NVR hard-drive requirements.
What Should You Do After Completing NEXIVUE Camera Setup?
After configuring the camera, verify local connectivity, add it to the NVR, test live video, and confirm recording.
I use this checklist after completing a camera installation:
| Configuration Check | Status |
|---|---|
| Camera powered | ✓ |
| Ethernet connected | ✓ |
| Finder detects camera | ✓ |
| Camera initialized | ✓ |
| IP address configured | ✓ |
| Subnet verified | ✓ |
| Gateway verified | ✓ |
| Camera accessible locally | ✓ |
| Camera added to NVR | ✓ |
| Live view tested | ✓ |
| Recording tested | ✓ |
This simple checklist can prevent many problems later.
Frequently Asked Questions
What Is Nexivue Finder?
Nexivue Finder is the official NEXIVUE IP Search Tool used to discover and configure compatible NEXIVUE devices on a local network.
I mainly recommend using it when you need to find a camera’s IP address or change its network configuration.
What Is Nexivue Finder Used For?
Nexivue Finder is used for NEXIVUE camera discovery and network configuration.
It can help identify cameras on the LAN and configure settings such as the IP address, subnet mask, gateway, and DHCP options where supported.
Can I Change a NEXIVUE Camera’s IP Address With Nexivue Finder?
Yes. Nexivue Finder can be used to change supported NEXIVUE camera network settings.
The configuration process includes settings such as:
IP address
Subnet mask
Gateway
DHCP
Administrator authentication may be required.
What Is the Default IP Address of a NEXIVUE Camera?
factory default IP address for NEXIVUE IP Camera is 192.168.1.100.
However, an already-configured camera may use another IP address.
If you don’t know the current address, I recommend using Nexivue Finder instead of relying only on the factory address.
Does Nexivue Finder Work Without Internet?
Yes. Nexivue Finder can discover devices on a local network without requiring internet access.
A camera, switch, and Windows PC can communicate locally even when the internet connection is unavailable.
Can I Use Nexivue Finder on a Windows Laptop?
Yes, Nexivue Finder is intended for use on a Windows PC, so a compatible Windows laptop can be used for camera configuration.
For initial setup, I prefer connecting the laptop to the camera network through Ethernet whenever possible.
What Should I Do if the NEXIVUE Camera Uses 192.168.1.100 but I Cannot Access It?
Check the PC’s IP address, subnet mask, camera power, Ethernet connection, and whether another device is using 192.168.1.100.
If the camera has already been configured, it may no longer use the factory IP.
Use Nexivue Finder to search for the current address.
Can I Access a NEXIVUE Camera Through a Browser?
Yes, supported NEXIVUE cameras can provide browser-based access.
However, you first need to know the camera’s IP address.
This is one reason Nexivue Finder is useful during initial setup.
What Is My Final Verdict on Nexivue Finder?
Nexivue Finder is a useful NEXIVUE IP Search Tool for discovering cameras, checking their network information, and configuring their IP settings.
I would not describe it as a complete CCTV monitoring application.
Its biggest benefit is solving a very specific problem:
“My NEXIVUE camera is connected to the network, but I don’t know its IP address.”
Finder is designed to make that process easier.
The official NEXIVUE documentation confirms its LAN discovery and network configuration capabilities, while the manufacturer’s Software page lists Nexivue Finder as an IP Search Tool.
If you are working with multiple IP cameras, I also recommend planning your IP addresses and network bandwidth before completing the installation.
For bandwidth planning, use the IP Camera Bandwidth Calculator
For recording-storage planning, use the CCTV Storage Calculator.
The main takeaway is simple: Nexivue Finder is most useful during NEXIVUE camera setup, IP address discovery, network configuration, and troubleshooting.